You can use xTool S1 with the rotary attachment to process cylindrical materials. With Rotary Attachment 2 Pro, you can also process spherical and irregular materials.
This page describes how to use xTool S1 with chuck for processing.
#1 Set up the rotary attachment
Rotary Attachment 2 Pro supports two working modes: Roller mode and Chuck mode. If you have xTool Accessory Kit for RA2 Pro, you can install the L-shaped module on Rotary Attachment 2 Pro to adapt to more scenarios.
When you use the Chuck mode, you can install jaw chuck components and jaw components based on your needs.


Note: For more information on how to assemble and set up the rotary attachment, see xTool Rotary Attachment 2 (RA2) User Guide and Tips for using the L-shaped module of RA2 Pro.
#2 Connect the rotary attachment to xTool S1
For the riser base of the ordinary version
(1) Insert one end of the connection cable into the device connection port of the chuck.
Note: If the connection cable included in the rotary attachment pack is incompatible with xTool S1, you need to purchase a compatible one.
(3) Insert the other end of the connection cable into the extension port on the inner side of xTool S1's front panel.
Note: Turn off xTool S1 before connecting it with the chuck.
For the riser base supporting conveyor feeder
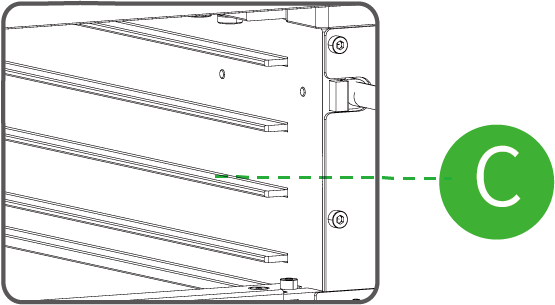
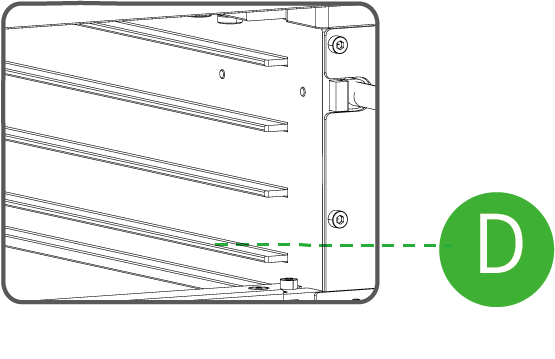
(1) The riser base supporting conveyor feeder has four levels of height to place the baseplate. You need to determine the level to place the baseplate based on the size of the material.
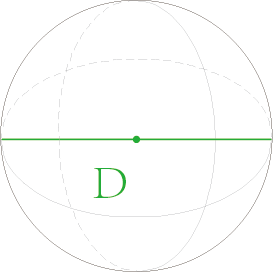
The following table shows how to choose levels for different sizes of materials in different working modes.
The working mode of the rotary attachment | The material diameter | The level of the riser base |
Chuck mode
| 4 mm ≤ D ≤ 82.2 mm |  |
14.2 mm ≤ D ≤ 100 mm |  |
(2) Insert one end of the connection cable into the device connection port of the chuck.
Note: If the connection cable included in the rotary attachment pack is incompatible with xTool S1, you need to purchase a compatible one.
(3) Place the chuck with the material in the processing area of xTool S1. Ensure that the long bottom edges of the chuck are parallel to the front and rear bottom edges of xTool S1.
(4) Insert the other end of the connection cable into the extension port on the inner side of xTool S1's front panel.
Note: Turn off xTool S1 before connecting it with the chuck.
#3 Start processing a cylindrical material
STEP 1 Place the material

Note: If you use the riser base of the ordinary version, ensure that the top surface of the material is within the processing range of xTool S1. If it is too far away from the laser module, you need to use an object to raise the height of the rotary attachment.
STEP 2 Open or create a project
You can open a project to start processing or create a new project. If you create a new project, you need to design patterns and set parameters from scratch.
Open a project

Note: The project file can contain information such as processing patterns, processing modes, and processing parameters. However, if the machine model, processing mode, or material thickness used in the project varies from the current situation, you need to reset the corresponding parameters.
Create a new project

STEP 3 Select the processing mode and material name


Note: If you can't find your material in the list, you can click More xTool materials to search among more materials in the Material EasySet Library. If you still can't find the name of your material, you can select User-defined material.
Note: After you select a material from the material list or Material EasySet Library, the software will automatically set parameters for laser processing. The default settings apply to xTool materials. You can adjust the settings based on your needs.

Note: If you turn on Laser module position, XCS will display the position of the laser module in real time. The red cross in the canvas indicates the laser module, and the coordinates of the laser module are shown in the Laser module position section.
STEP 4 Set the laser focus
xTool S1 has a distance sensor, which can measure the distance between the laser module and the top material surface. You can also manually measure and calculate the distance between the laser module and the top material surface, and input the obtained values into XCS.
During processing, xTool S1 will perform auto-focus based on the Distance parameter.
Auto measure

 , the Auto-measure icon, and xTool S1 will automatically measure the distance from the laser module to the material surface.
Note: Before auto-measure, ensure that the probe of the distance sensor is not extending.

Manual measure


STEP 5 Design objects for processing
Note: XCS supports importing the following image formats: SVG, DXF, JPG, JPEG, PNG, BMP, etc.


Note: If you select an image object, you can edit the image by using the tools on the right side of the canvas.
STEP 6 Set parameters for processing

Note: You need to set parameters for every object. A missed object may fail to be processed. The parameters that can be set for bitmap objects and vector objects are different. You can select multiple objects of the same type and set parameters for them at once.
Note: For a detailed explanation of each parameter, see Software Learning Center.
STEP 7 Model preview

STEP 8 Preview the processing area

Note: You can tap the arrow buttons to control the movement of the laser module. The other three parameters allow you to configure how the laser module moves with every tap on an arrow button. XY speed (mm/s): The moving speed of the laser module in X and Y directions.XY distance (mm): The moving distance of the laser module with each tap on an XY arrow button.Z distance (mm): The moving distance of the laser module with each tap on a Z arrow button.


STEP 9 Start processing

 button, and XCS will show you the processing path.


Services & Help
Learn & Community
Copyright © 2025 xTool All Rights Reserved.
