A. Supplies & Accessories
1. What spare parts and tools should I keep on hand?
To ensure uninterrupted operation and rapid maintenance, xTool recommends stocking the following:
Maintenance Tools:
- Lint‑free swabs*
- Lint-free cleaning cloths*
- Moisturizing liquid*
- Cleaning solution*
- Nitrile gloves
- Plastic bag for disposal*
- Hex screwdriver*
- Phillips screwdriver
- Hex keys of different sizes
- Syringe*
*This item(s) is/are already included in your xTool Aparel Printer package.
Consumable Parts:
- Ink pads
- Ink scrapers
- Ink damper
- Ink tube*
Note: For optimal print quality, use ONLY xTool DTF film and inks designed for xTool Apparel Printer.
2. What sample materials are included with my xTool Apparel Printer and xTool OS1 Automatic Shaker Oven Machine?
xTool Apparel Printer package includes:
- One 500ml bottle of each CMYK ink (Cyan, Magenta, Yellow, Black)
- One 500ml bottle of White ink
- One 500ml bottle of moisturizing liquid
- One 25m roll of PET film
- One 100ml bottle of cleaning liquid
xTool OS1 Automatic Shaker Oven Machine includes:
- One 1kg bag of adhesive powder
3. If I don't have the xTool OS1 Automatic Shaker Oven Machine, how can I process the printed PET film for heat pressing?
If you only have an xTool Apparel Printer, you will need to use a separate baking oven or heat source to cure the adhesive powder. After printing on the PET film, you will need to:
- Manually apply the DTF adhesive powder evenly over the printed areas.
- Carefully place the powdered PET film into your baking oven or under your heat source.
- Heat the film until the adhesive powder melts and forms a smooth, even layer. Once the powder is fully melted and cured, the film is ready for heat pressing onto your garment.
B. Consumables & Replacement Intervals
1. Why is the cutting effect on PET film unsatisfactory? / How often should the blade be replaced?
- Blades are consumable items with an approximate lifespan of 12000~15000 cuts. New blades will cut cleanly through PET film; as they wear, however, you may see incomplete cuts or jagged edges. Replace the blade immediately upon noticing these issues.
2. What is the function of the ink pad?
- After each print, the print head returns and presses onto the ink pad, with springs beneath the pads providing a buffer.
- This seal creates a closed ink path. The waste‑ink pump draws ink through it to purge clogging ink residuals and clean the ink nozzles.
3. How often should I replace the ink pads?
As they are consumables, replace them if you observe any of the following:
- Routine Wear: General aging or wear after prolonged use causes air leaks.
- Surface Damage: If the pad surface is rough, cracked, pitted, or has hardened ink residue causing air leaks.
- Poor Fluid Retention: If the pad cannot hold moisturizing or cleaning solution (liquid passes through immediately).
4. What is the expected lifespan of the print head?
- Under normal use and proper maintenance, a print head typically lasts 1–2 years. Proper cleaning and use of xTool ink are critical to achieving this lifespan.
- Neglecting maintenance, however, may accelerate clogging, affecting print performance.
5. What should I keep in mind when adding ink to xTool Apparel Printer?
When adding ink:
- Always shake the ink bottle thoroughly before pouring, especially the white ink, to ensure it is well mixed.
- DO NOT overfill the ink tanks. Leave some space at the top to prevent spills or overflow.
- Any remaining ink can be safely stored in its original bottle with the cap tightly sealed.
6. Can I use PET film from brands other than xTool?
- It is highly recommended to use official xTool PET film. xTool film has undergone extensive testing to ensure optimal compatibility and print quality with the xTool Apparel Printer.
- While other brands might work, xTool cannot guarantee their performance or the results, and using them may lead to printing issues.
7. How much white ink does an xTool Apparel Printer typically consume in a month?
Ink consumption varies:
- With no print tasks (i.e., device on standby under automatic maintenance): The printer consumes a small amount of ink for its automatic maintenance routines.
- Assuming that automatic cleaning occurs every 3 days, it uses approximately 3ml of color ink and 3ml of white ink per cycle. This results in a monthly maintenance consumption of about 30ml of white ink and 30ml of total color ink (approximately 7.5ml for each CMYK color).
- With print tasks: The amount of ink used will depend on the size of your designs, the number of passes selected in the software, and print frequency.
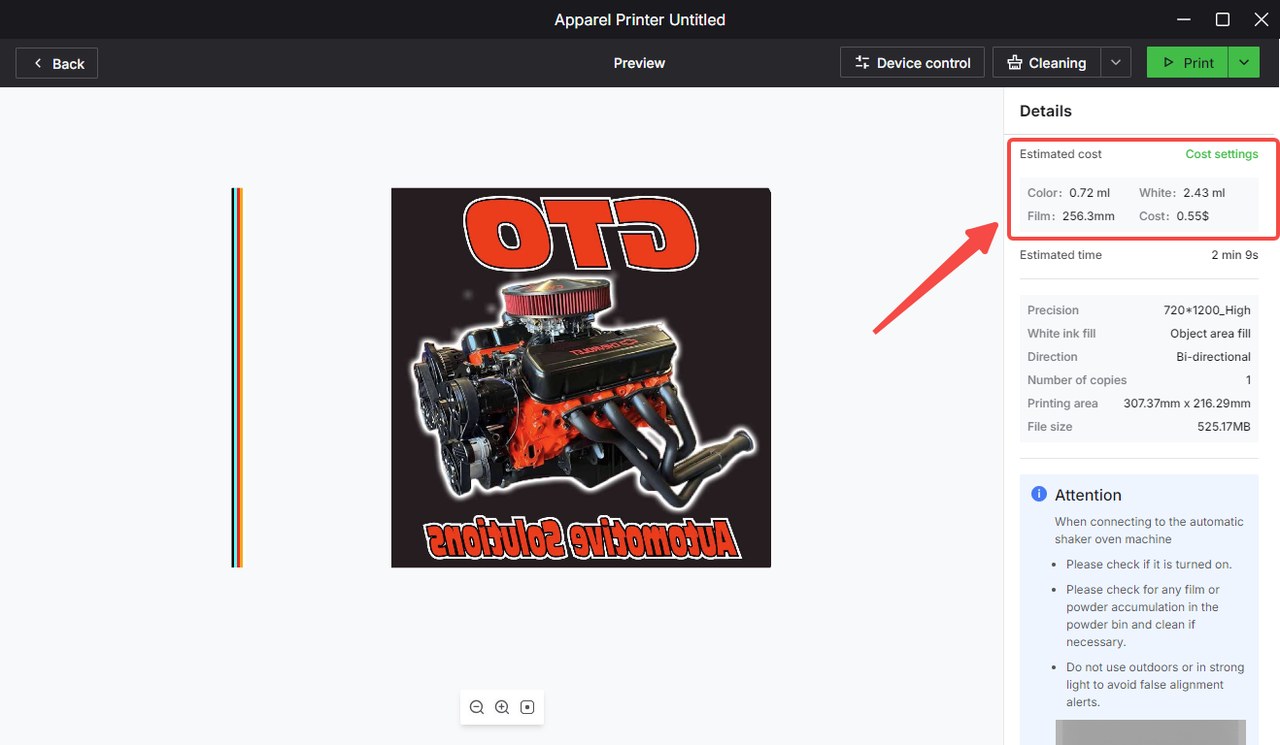
- For accurate estimates based on your specific designs, xTool recommends using the ink Estimated cost feature available in xTool Creative Space (XCS) software (see the image below).

8. Approximately how many prints or how many meters can I get from a 500ml CMYKW ink bottle?
- The yield from a 500ml ink bottle depends heavily on the print settings (like the number of passes) and the size and color density of your designs. For the most accurate estimate for your specific projects, ink Estimated cost feature is available in xTool Creative Space (XCS) software for reference (see the image below).
C. Environment & Maintenance
1. Why is maintaining the environment's temperature and humidity important?
Because ink performance is temperature-sensitive. Ink viscosity and jetting performance are calibrated for 15–35 °C (59–95 °F) at moderate humidity.
- Above 35°C (95°F), ink may splatter, leading to blurred edges in print output.
- Below 15°C (59°F), ink viscosity increases, causing frustrating printing outputs such as faded ink, ink layering, or ghosting. Due to the abruptly elevated ink viscosity, there is a delay before the ink reaches the print head's optimal operating temperature. Additionally, low temperatures can cause ink nozzle clogging and reduce the overall flow consistency of the ink.
2. Why is regular print head precision calibration necessary?
- During printing, the print head carriage moves back and forth in a reciprocating motion. This movement can induce slight oscillations, resulting in a minor deviation between the actual position of the print head and its calibrated position.
- Consequently, issues such as white ink misalignment, double printing, and blurred patterns may occur. Regular calibration ensures that the print head maintains accurate positioning, thereby preserving print quality.
3. Why does the printer need to remain powered on (to enable the white‑ink circulation)?
- White ink contains titanium dioxide particles that easily settle when static. To keep the titanium dioxide particles in constant motion, a built‑in circulating pump is designed to continuously flow white ink through the tubing to keep the pigment suspended and prevent clogging. For this system to function, the printer must remain powered on at all times.
4. How should I maintain the printer after extended downtime?
For Downtime of Up to 1 Week:
- Move the carriage away from the pad.
- Fill the pad with moisturizing liquid until its surface is flush with the pad edges.
- Return the carriage to allow the print head to soak.
- Soak the print head for 30 minutes.
Refer to the video tutorial below for instructions on deep-soaking the print head before initiating the standard auto-cleaning procedure.
For Downtime of Half a Month or More:
- Perform a complete manual deep cleaning of the print head.
Refer to the video tutorial below for a detailed manual cleaning procedure for the print head.
5. How can I prevent and clear print head clogs?
- Prevention:
- Use High-Quality Ink: Impurities or particles in lower-quality ink may clog the print head. Recommend to use xTool ink.
- Regular Cleaning: Clean both the exterior and interior of the printer, including the print head, on a routine basis to prevent the accumulation of dust, dirt, and other ink residuals.
- Frequent Use: Extended periods of inactivity can cause the ink to dry and harden. Regular operation helps maintain uninterrupted ink flow and minimizes the risk of clogging.
- Routine Maintenance: Consistent preventive maintenance greatly reduces the probability of print head blockage.
- Controlled Environment: To avoid ink drying or evaporation, store the printer in a cool, dry environment.
- Cleaning Methods:
- Auto-cleaning
- Auto-deep cleaning
- Print head soaking
- Complete manual deep cleaning
6. How do I maintain my print head's humidity in dry conditions?
- Increase room humidity (e.g., with a humidifier).
- Perform more frequent cleaning cycles.
7. How do I replace and refill the ink dampers?
Refer to the tutorial at: Replace the White & CMYK Ink Damper in xTool Apparel Printer
8. How do I clean the residual ink under the pad cover?
- Blot excess with paper towels or a lint‑free cloth and gently wipe with a non‑woven cleaning cloth.
9. How do I maintain the encoder strip?
- Wipe the strip with a lint‑free cloth lightly moistened with ethanol. See the video below for details.
10. What precautions should I take while soaking the print head?
- Inspect the Ink Pad: Ensure the ink pad is intact and free from any damage. A compromised ink pad can lead to cleaning solution leakage, rendering the soaking process futile.
- Limit Soaking Duration: DO NOT immerse the print head in the cleaning solution for more than one hour, as prolonged exposure may damage the print head.
- Maintain Proper Cleaning Solution Level: The cleaning solution should be level with the surface of the ink pad; it must not exceed the height of the ink pad.
11. What should I do if my printer will remain unused for an extended period?
Follow these steps to properly prepare the device for long-term inactivity and prevent deterioration.
- Print Head Preparation:
- Clean the print head and run a sample printing test to verify the condition of the stripe lines.
- System Cleaning and Carriage Reset:
- Move the print head (carriage) to the left and power off the machine.
- Flush the print head using a cleaning solution, then add a moisturizing agent.
- Use a cotton swab to clean the scraper and ink pad.
- Reposition the carriage to the center and power the machine on.
- Using the ink control software, perform an ink extraction cycle and flush the ink pad with purified water.
- Clean the waste ink tube and ink pump until the discharged waste ink is clear.
- Add additional moisturizing agent to the ink pad as needed.
- Reset the carriage through the LED panel.
- White Ink System Maintenance:
- Pour the white ink back into its original container.
- Rinse the container and refill it with purified water.
- Remove a section of the white ink circulation tube and activate the cleaning cycle to flush the tube.
- Simultaneously, use a pump to extract white ink until the entire white ink circuit appears colorless.
- White Ink Reservoir Drainage:
- Detach the two soft tubing lines from the white ink reservoir.
- Suspend the thinner tube.
- Place the thicker tube into a container to catch any residual liquid.
- Continue operating the white ink circulation motor until no more liquid is expelled.
- Use a syringe to extract any remaining liquid from the white ink bag.
- Final Steps:
- Fasten all ink tube clips to secure the system.
- Disconnect the power to fully shut down the device.
By following these detailed steps, you ensure that the equipment remains properly maintained during periods of inactivity, reducing the risk of issues when it is brought back into service.
Refer to the video tutorial above for a manual cleaning procedure.
12. Should I keep my xTool Apparel Printer powered on when not in use?
- Yes, it is recommended to keep your printer powered on at all times.
- This allows the printer to perform its scheduled automatic maintenance procedures, which are crucial for printhead health and optimal performance.
13. What are the ideal environmental conditions for operating my xTool Apparel Printer?
For optimal performance and to reduce the risk of print head clogging, operate your printer in an environment with:
- Temperature: 20°C to 30°C (68°F to 86°F)
- Relative Humidity: 50% to 80% RH
If your environment does not meet these conditions, consider using devices such as a humidifier or dehumidifier to maintain the recommended temperature and humidity levels.
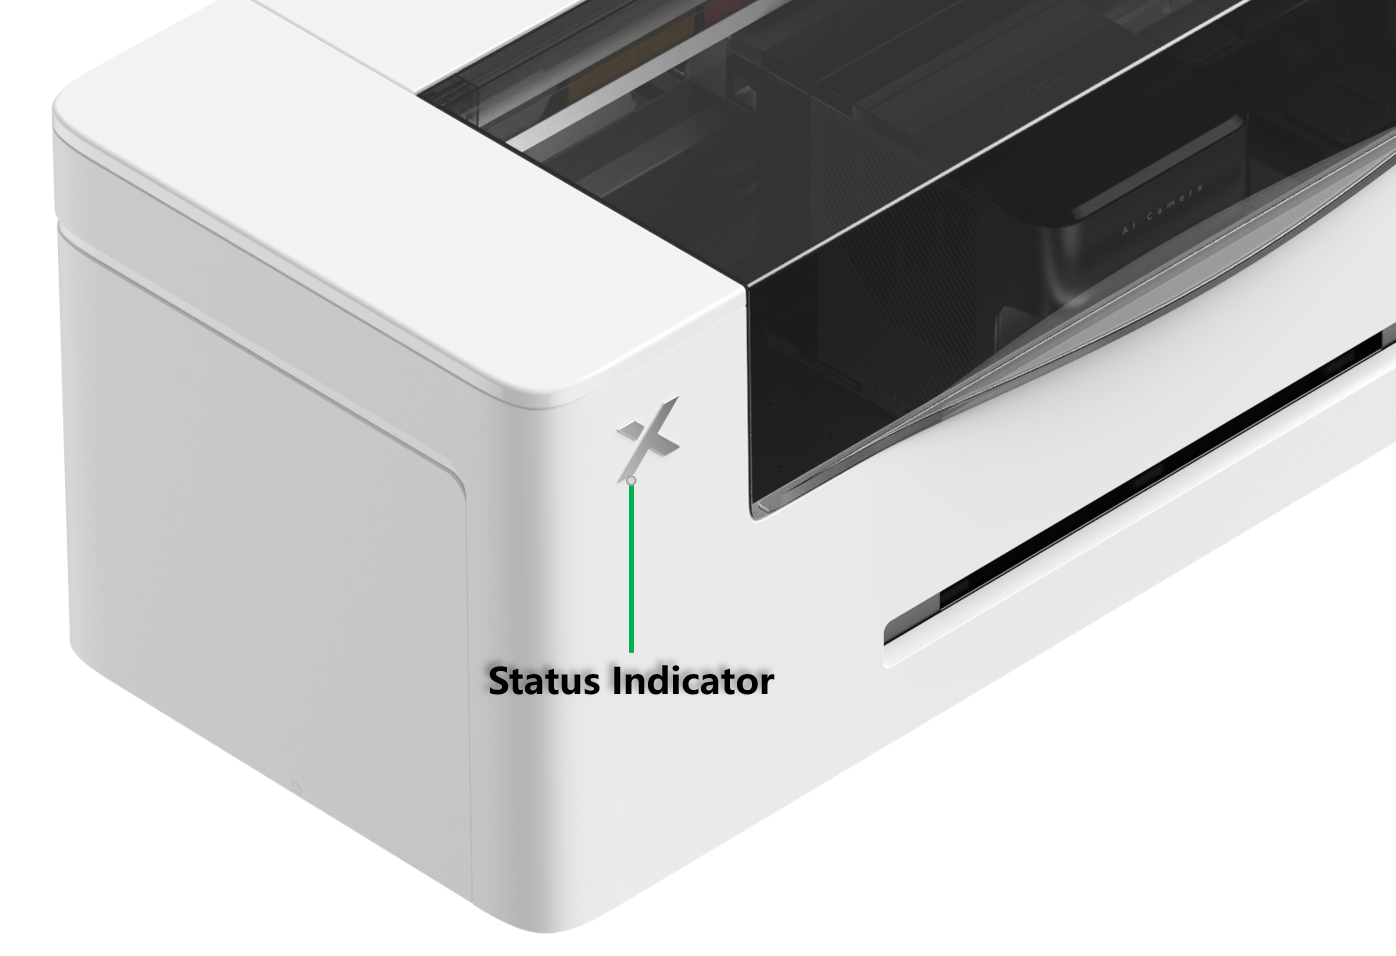
14. Why do I sometimes see other colors at the edges of the white "X" status indicator light on the printer?
- The "X" status indicator light on the printer uses RGB (Red, Green, Blue) LEDs to create a white light. Due to the way these colors combine, you might occasionally observe slight tinges of other colors at the very edges of the light. This is a normal optical effect and does not indicate a problem with the machine or affect its operation.
15. Where can I find instructions for the daily cleaning and regular maintenance of my xTool Apparel Printer?
- To learn how to perform daily cleaning and other regular maintenance tasks for your printer, please watch the dedicated video tutorial available on our support website: Routine Cleaning & Care for xTool Apparel Printer
D. Software & Operation
1. Why is there no power switch on the printer?
- To support automatic maintenance and white‑ink circulation, the printer is designed to remain continuously powered. We recommend never unplugging the unit during normal operation.
2. What is the feathering function?
- In the printing process, each movement of the print head is defined as one "pass." The contact between adjacent passes creates a straight line. When these straight-line contacts intersect—for example, between the first and second passes and between the second and third passes—the intersections can appear harsh, similar to drawing two distinct horizontal lines.
- The feathering function softens or blurs the edges of these straight lines, thereby preventing the appearance of horizontal bands within solid color areas.
- A higher feathering value improves the seamlessness of the pass junctions and reduces the likelihood of visible streaks. However, it may also result in slower printing speeds and increased ink consumption.
3. How do I evaluate my sample printing test result?
- Nozzle Failure Rate:
- Ensure the nozzle failure rate is ≤1%. This means that in each of the four channels of the print head, no more than 4 nozzles should be clogged (i.e., no more than 12 missing strip lines).
- Interpretation:
- Good Print Quality: If the failure rate is ≤1%, it indicates that the print head is nearly free of clogs, and actual print results should be satisfactory.
- Poor Print Quality: If the failure rate >1%, perform a standard auto-cleaning.
- If this does not improve the situation, proceed with deep auto cleaning or soaking in cleaning solution as needed.
- Maintenance Reference:
- For detailed steps on maintaining clogged print heads, refer to the print head clogging maintenance video in the Maintenance section.
4. Which Raster Image Processor (RIP) software does the printer use? Can I use third‑party software?
- Built‑In RIP: The Apparel Printer uses integrated RIP functionality within XCS.
- Licensing: XCS is free to download; some advanced features require purchase.
- Third‑Party Software: Not supported.
5. Why won’t my USB drive be recognized? Which formats are supported?
- Supported Formats: FAT32, NTFS, exFAT.
- Notes:
- Some USB drives may still be unrecognized due to hardware differences.
- Type‑A drives may require a USB hub; Type‑C drives can plug in directly.
- Inconsistent hubs can also cause recognition failures.
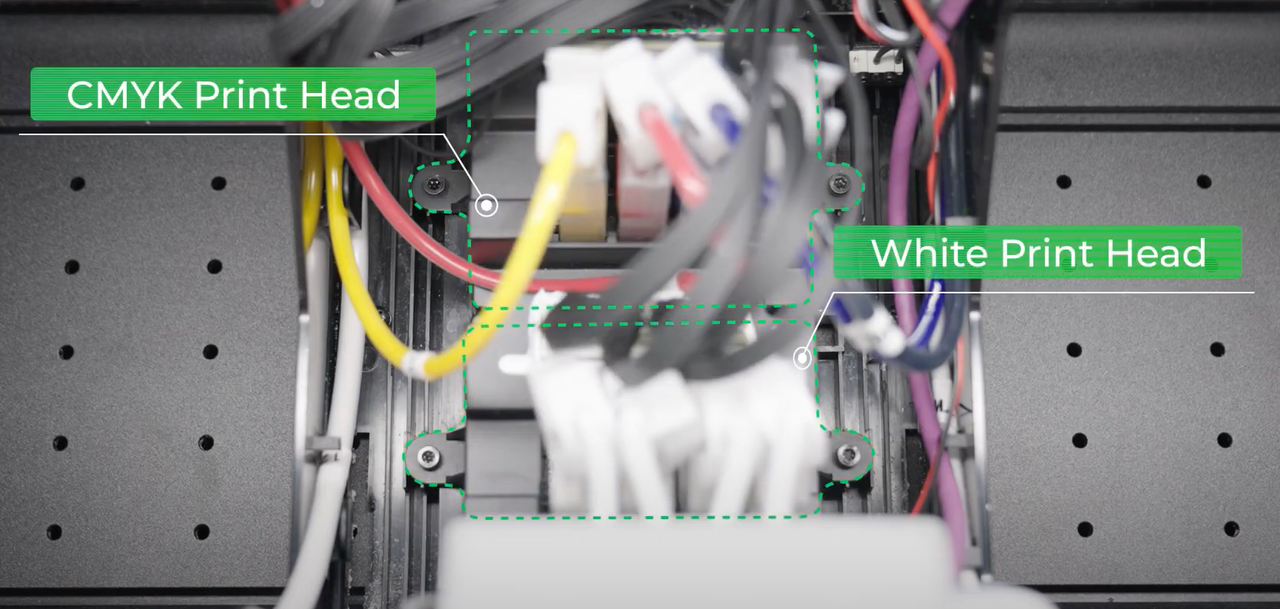
6. What is the difference between the two print heads on my xTool Apparel Printer?
xTool Apparel Printer has two printheads:
- The inner printhead (closer to the inside of the machine) is used for printing color inks: Cyan, Magenta, Yellow, and Black (CMYK).
- The outer printhead (closer to the front of the machine) is dedicated exclusively to printing White ink.
In essence, both print heads are identical in design and function. They are differentiated solely by their connection to distinct ink tube systems.
7. How do I correctly load and align the PET film in xTool Apparel Printer?
When loading the PET film:
- Ensure the film is taut (not loose or buckled).
- Align the right edge of the PET film with the white alignment mark inside the printer.
Proper alignment is crucial for correct machine operation and print quality. For a visual guide, please refer to the video tutorial: Replace the Brackets & Adjust the Ball Bearings on xTool Apparel Printer
8. What is the correct way to position the PET film for loading into the printer?
- Pay close attention to the orientation of the PET film roll. You must ensure that the film feeds into the machine from the top of the roll, not from the bottom. Incorrect orientation will negatively affect print quality.
9. What is the maximum continuous printing length supported by the xTool Apparel Printer?
- xTool Apparel Printer currently supports a maximum continuous printing length of 460mm. This limit is also reflected in xTool Creative Space (XCS) software, which will provide a notification if a design exceeds this length.
10. Does xTool provide a third-party API for custom software integration with Apparel Printer?
- No, the control algorithms for xTool Apparel Printer are proprietary and developed by xTool. Therefore, even if third-party software could generate print data, it would not be able to directly control the printer via an API for printing.
11. Does xTool Creative Space (XCS) software offer color correction or ICC color management features?
- Currently, the XCS software does not support advanced color correction features or ICC color profile management. However, xTool is always working on improving its software products; please stay tuned for future updates regarding these capabilities.
12. Can I use my own custom designs for printing on T-shirts and other apparel?
- Yes, absolutely.
- xTool Creative Space (XCS) software allows you to import a wide variety of file types, including common image formats (like PNG, JPG) and vector files (like SVG). For the best print quality, xTool recommends using high-resolution images and vector graphics for your designs.
13. What is the maximum number of items that can be processed in a single batch for printing (printer) or baking (shaker oven)?
- The maximum number of items (e.g., individual designs or sheets) that can be queued in a single batch task is 10 for both xTool Apparel Printer and xTool OS1 Automatic Shaker Oven Machine.
E. Printing & Safety
1. What type of ink does xTool Apparel Printer use?
- Water‑based direct-to-film (DTF) coating inks formulated for vibrant, durable prints.
2. Why should I use official xTool ink?
The quality of the ink directly impacts printer performance and longevity. xTool ink is recommended because it is specifically formulated and thoroughly tested to work with the device, considering several key factors:
- pH Level: The ink's acidity or alkalinity is critical. Some metal parts in the printer, particularly those in contact with the PET film, are susceptible to corrosion. xTool inks are formulated with a neutral pH to minimize corrosion risks.
- Flow Properties: Ink viscosity and stability are essential for consistent performance. A common test for DTF printer inks involves leaving a sample exposed to air for one month to observe any severe particle sedimentation. xTool inks are designed to maintain optimal flow properties over time.
- Surface Tension: Lower surface tension contributes to finer, more delicate printed details. High-quality official inks ensure that the ink's surface tension is low, resulting in smoother and more refined print lines.
- Firmware Calibration and Print Head Compatibility: Apparel printers utilize EPSON piezoelectric print heads, which require precise synchronization between the ink properties and the print head's waveform settings. The firmware is pre-calibrated with waveform parameters specifically tailored for official ink. Using third-party or substandard ink can lead to degraded print quality and potential print head damage.
Using xTool ink ensures that all these factors are optimized, thereby delivering consistent print quality and protecting your printer over time.
3. Are ink, moisturizing liquid, and cleaning solutions included in my package hazardous?
- No. These liquids are non‑hazardous and may be rinsed down the sink.
4. Why are my printed patterns easily wiped off?
- Wet Print Condition: Immediately after printing, the image remains wet, making it vulnerable to smudging or removal before it has fully dried.
- PET Film Limitations: Patterns printed on PET film cannot be directly transferred to fabric using standard heat transfer processes.
- Required Post-Processing: To ensure proper transfer, additional steps are necessary. With a powder-dispersion curing machine, namely xTool OS1, you can apply, shake, and dry the adhesive powder in one process before transferring the image. Without such equipment, you must manually apply heat-sensitive adhesive powder, evenly distribute it, and then use alternative drying equipment to cure the print prior to transfer.
5. What should I do if the print carriage jams the print film during printing?
- Move the Carriage: Return the print carriage to its home position using either manual controls or the LCD panel.
- Trim the Film: Manually cut away any deformed sections of the film to ensure smooth alignment and proper film continuity for subsequent operations.
6. What should I do if the film gets caught in the oven in order to prevent film powder from entering the printer?
- Control Film Feeding: Use the software's feed/withdraw buttons to carefully control the film's movement.
- Ensure Proper Release: Continue adjusting the film feed until it is fully released and falls into the designated film output tray, thereby preventing any film powder from being carried into the main unit.
7. What is the correct procedure for unplugging and reconnecting the printer's power cord?
To ensure safety and protect the equipment:
- When unplugging: First, disconnect the power cord from the electrical outlet (wall socket). Then, disconnect the cord from the printer itself.
- When reconnecting: First, connect the power cord to the printer. Then, plug the cord into the electrical outlet.
8. Is it safe to open the printer's lid or lift/right-side panels while xTool Apparel Printer is operating?
- No. For your safety, DO NOT open the lid or the side panels while the printer is printing or performing any operation. The machine contains moving parts, including a cutting blade, which could cause injury if any lid or side panels are opened during operation.
Documentation feedback
Help improve this content by providing feedback. If this content did not meet your requirements, select "No" in the "Was this page helpful?" section below. Include specific details about what was unclear or missing in the pop-up suggestion box. Feedback submissions are reviewed by xTool technical writers to enhance future documentation.
Services & Help
Learn & Education

Copyright © 2025 xTool All Rights Reserved.