xTool Rotary Attachment 2 Pro allows you to process regular and irregular cylindrical materials. You should use the rotary attachment with xTool M1 Ultra riser base, which raises the height of xTool M1 Ultra. Rotary Attachment 2 Pro supports two working modes: Roller mode and Chuck mode.
💡 Note: Rotary Attachment 2 Pro kit is sold separately. It is only included in the deluxe kit of xTool M1 Ultra. |
Process materials with the roller mode
You need to determine the level at which the honeycomb panel is to be placed based on the diameter of the material, as described in the following table.
 | Placement level | Supported material diameter (D) |
α | / | |
β | 3 mm ≤ D ≤ 27.5 mm | |
γ | 27.5 mm ≤ D ≤ 75 mm | |
δ | 75 mm ≤ D ≤ 99 mm |
In the roller mode, you need to set the level of the adjustable roller.
| Roller level | Supported material diameter (D) |
 Level A | 3 mm ≤ D ≤ 50 mm | |
 Level B | 45 mm ≤ D ≤ 60 mm | |
 Level C | D > 60 mm |
💡 Note: For detailed information and instructions on how to use the rotary attachment, see User Manual for Rotary Attachment 2 (RA2). |
Example - process a cylinder with a diameter of 20 mm
(1) Remove the baseplate. Check the table and find the honeycomb panel should be placed at Level β.

(2) Close the front panel.

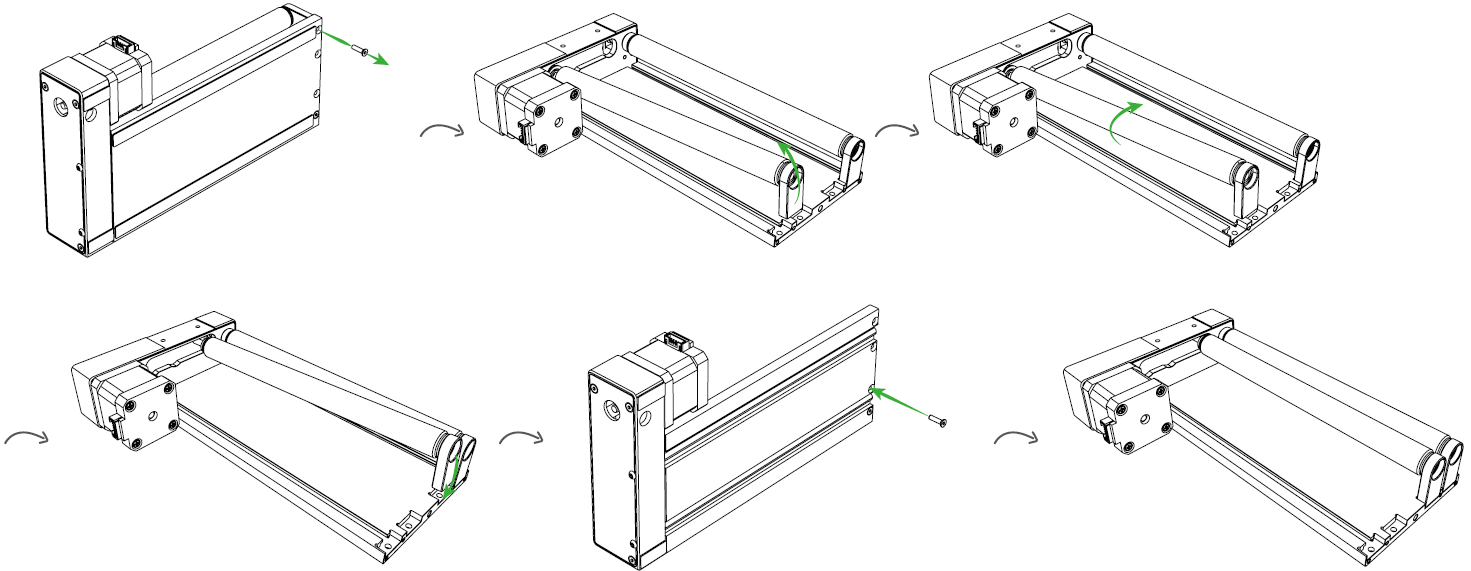
(3) Set the roller to Level A.
(4) Insert one end of the connection cable into the connection port of the rotary attachment.

(5) Place the rotary attachment with the material on the honeycomb panel.

(6) Open the silicone plug of the rotary attachment port on the inner side of xTool M1 Ultra's front panel.

(7) Insert the other end of the connection cable into the rotary attachment port. Connect the rotary attachment to xTool M1 Ultra.

(8) Connect xTool M1 Ultra to XCS, and select Roller - Use rotary attachment on XCS.


(9) In the top right corner of User-defined material, select the name of your material and click Confirm.
Click More xTool materials in the bottom left corner to search for more materials. If you can't find the name of your material, you can select User-defined material.


(10) Use the left-side tools to create objects on the canvas.


(11) Select objects on the canvas and set parameters for them.

(12) After you set the parameters for the object, click the flag to mark the processing area on the upper toolbar.

Select a marking mode Line, and click Start marking.

Manually move the laser module to make the red cross spot fall at a side of the target processing area, and press the Point marking button on the device to record the position.
Then, repeat the same steps to record the other side for the target processing area. You should mark the point at the highest point of the material.
(13) Make sure two points are marked. Click End marking > Done, and then the target processing area will be marked out on the canvas.

(14) Open the lid. Move the laser module over the material to allow the red cross to fall at the highest point of the material.

Close the lid and Click Auto-measure icon to measure the distance automatically.

(15) At the bottom right corner of XCS, click the  icon next to the framing button to set the framing speed.


Click Framing and Press the button on xTool M1 Ultra to start framing.


After you confirm that the processing area is proper, click Framing completed in XCS.

(16) On the bottom right corner of the software, click Go to Process.

Check whether the accessories or modules are prepared before processing.
In the upper right corner of XCS, click Start. Press Start to start processing.

When everything is ready, press the button on xTool M1 Ultra to start processing.

Process materials with the chuck mode
You need to determine the level at which the honeycomb panel is to be placed based on the diameter of the material, as described in the following table.
 | Placement level | Supported material diameter (D) |
α | / | |
β | / | |
γ | 0 < D ≤ 48 mm | |
δ | 48 mm ≤ D ≤ 108 mm |
💡 Note: For detailed information and instructions on how to use the rotary attachment, see User Manual for Rotary Attachment 2 (RA2). |
Example - process a sphere with a diameter of 40 mm
(1) Check the table and find the honeycomb panel should be placed at Level γ.

(2) Close the front panel.

(3) Insert one end of the connection cable into the connection port of the rotary attachment.

(4) Place the rotary attachment with the material on the honeycomb panel.

(5) Open the silicone plug of the rotary attachment port on the inner side of xTool M1 Ultra's front panel.

(6) Insert the other end of the connection cable into the rotary attachment port. Connect the rotary attachment to xTool M1 Ultra.
(7) Connect xTool M1 Ultra to XCS, and select Chuck - Use rotary attachment.

Enter the diameter of the material. You can select Diameter or Perimeter.


(8) In the top right corner of User-defined material, select the name of your material and click Confirm.
Click More xTool materials in the bottom left corner to search for more materials. If you can't find the name of your material, you can select User-defined material.

(9) Use the left-side tools to create objects on the canvas.

(10) Select objects on the canvas and set parameters for them.

(11) After you set the parameters for the object, click the flag to mark the processing area on the upper toolbar.

Select a marking mode Line, and click Start marking.

Manually move the laser module to make the red cross spot fall at a side of the target processing area, and press the Point marking button on the device to record the position.
Then, repeat the same steps to record the other side for the target processing area. You should mark the point at the highest point of the material.
(12) Make sure two points are marked. Click End marking > Done, and then the target processing area will be marked out on the canvas.
(13) Open the lid. Move the laser module over the material to allow the red cross to fall at the highest point of the material.

Close the lid and Click Auto-measure icon to measure the distance automatically.

(14) At the bottom right corner of XCS, click the icon next to the framing button to set the framing speed.
Click Framing and Press the button on xTool M1 Ultra to start framing.
After you confirm that the processing area is proper, click Framing completed in XCS.
(15) On the bottom right corner of the software, click Go to Process.

Check whether the accessories or modules are prepared before processing.
In the upper right corner of XCS, click Start. Press Start to start processing.
When everything is ready, press the button on xTool M1 Ultra to start processing.
Services & Help
Learn & Community
Contact Us

Copyright © 2025 xTool All Rights Reserved.